Showing posts with label recipes. Show all posts

Thursday, 1 April 2010

Easter Cake

Having not one but two wedding cakes to make in the foreseeable future, I thought I should probably learn how to deal with fondant or royal icing. We were also visiting T's parents for Easter weekend, so I took the opportunity to make a bigger cake than I would normally and palm some of it off on them.

I started with the Simnel cake in from the April edition of Delicious. I didn't read it through before baking it, so I didn't realise you had to bake a layer of marzipan in to the cake. I didn't have any marzipan, and I don't like the stuff, so I skipped this step. I thought this might make the cake a bit dry, so I soaked the cake in marsala, lemon juice and sugar syrup before icing it.

I initially planned to do royal icing, but life got in the way and I ran out of time to do the icing in stages. Each stage has to be left 24 hours to dry, and I only had one afternoon. I went for fondant instead.

Trusty old Leith's came out. Syrup was boiled to the soft ball stage, then kneaded on the worktop with a spatula. It then stuck to the worktop, and made such a pathetically small ball of icing when I did prize it away that I gave up and binned it. Then I spent 15 minutes chipping the remaining sugar off the worktop with a knife. On the plus side, they played "Sit Down"by James on the radio and I still know all the words. That makes me feel very old indeed.

I decided to give another recipe a go before giving up and buying ready-made icing. This was much more successful; soon I had a rather large ball of sugar paste, and a kitchen covered in icing sugar. It took me several attempts to roll the icing out large enough to cover the cake, as it kept sticking. I only used icing sugar, but with hindsight I should have used some cornflour too to make it stick less.

Once I'd done the cake, I smoothed off any bumpy bits and tears with wet fingers and a paring knife. Classy.

I dyed the remaining icing into several colours to decorate the cake with, and went crazy with some miniature cutters I was given at Christmas.

Fondant confetti shapes

They were still a bit dusty at this point from the cornflour, but I'll brush that off later when it's hardened.
Fondant chick

I had loads of icing left over so I tried to make a hatching chick. The egg part fell to pieces but the chick survived.

Easter Confetti Cake

Given that this is my first time making this type of icing, as well as my first attempt to cover and decorate a cake, I feel quite chuffed. The surface isn't entirely flat, and the shapes aren't uniformly spaced, but it looks like vaguely good.

Fondant Icing
Makes enough to cover & decorate a large cake.

450g icing sugar
50g glucose
1 large egg white
flavours and colours
cornflour for dusting

1) Put the icing sugar in a bowl, sieving it if it's very lumpy. Make a well in the centre.
2) Add in the egg white, glucose and any flavourings and colours you want to use (such as lemon, orange flower, peppermint etc).
3) Knead the mix in to a smooth dough.
4) Dust a large surface with icing sugar and cornflour, and roll the icing to the desired shapes.

TIPS
- You can use the white icing to cover a cake, and then colour and flavour the offcuts to use as decorations.
- A drop of blue colouring makes white icing seem even whiter.
- Keep the icing in an airtight bag or covered with a damp cloth when you are not using it - it dries out quickly.
- If it does start drying out, add a drop of egg white or water to the paste to make it more malleable.

Friday, 26 March 2010

Indulgent Chocolate Mousse

Part of the reason I find myself flipping through Leith's quite so often is that it's great for basic recipes. It's Delia for people who know how to boil an egg. After a batch of meringues left me with several egg yolks, I sought out a recipe for a classic chocolate mousse.

Rich chocolate mousse - unfortunately I ate it before I could photograph the bubbles.

The 'classic' recipe used whole eggs, so I opted for the 'rich' version instead. It was pretty simple to make, although as usual, me and boiling sugar do not get on. The recipe calls for the sugar syrup to be boiled to short thread stage. The suggested way of testing this is to dip your fingers in the sugar and see if a short thread is formed. I didn't fancy putting my hand in boiling sugar (I have definitely been there and done that) so I got the ancient sugar thermometer out instead. Annoyingly, while 'crack' and 'softball' were marked, short thread was not.

I figured that if Prue Leith was telling me to stick my hand in boiling sugar, it can't be that hot. I boiled it to around 80C, although finding the sugar syrup table in the book later (why is it not indexed?) I found out that short thread stage is actually 108.3C. So there.

This probably explains why my mousses were a bit denser than I'd expected, as the syrup and egg yolks didn't fluff up as much as the book said they would. They were still pretty damn tasty, and I filled 5 ramekins with a gloriously thick chocolate goo. I used very dark chocolate, and I think in recipes like this, it is a travesty not to. The chocolate gets watered down with cream and sugar during the process of the recipe, so using a milky chocolate to start with will just dilute it even further. You'll basically have a homeopathic chocolate mousse, and that's not going to cure any ills.

With hindsight, I think it might have been nice to swirl a bit of raspberry puree through as well. It is very rich, so a bit of fruitiness would balance that well.

Rich Chocolate Mousse (Adapted from Leith's Cookery Bible)
Makes 4-6 depending on ramekin size

70g granulated sugar
110ml water
3 egg yolks
170g very dark chocolate
300ml double cream

1) Heat the sugar and water in a small saucepan gently. Heat until it reaches the short thread stage (a thread of about 1cm between a wet thumb and finger, or 108C/227F). Leave to cool slightly.
2) Give the egg yolks a quick whisk in a large bowl to combine them. Slowly pour in the cooled syrup, whisking all the time. Continue until the mixture is thick and bubbly.
3) Melt the chocolate in a microwave or bain marie. Fold the melted chocolate in to the eggs.
4) In a separate bowl, whip the cream until it forms soft peaks. Gently fold this in to the mousse mixture.
5) Pour the mixture in to ramekins (maybe layer with some raspeberry puree at this point) and leave to set in the fridge for 4 hours.

Wednesday, 24 March 2010

Black and White Shortbread

I have been shying away from some of the more frivolous cookbooks in my collection, and find myself returning again and again to the Leith's Cookery Bible. I quite like the way pages upon pages of it are filled with French sounding dishes I've never even heard of. The first chapters give advice on how to cater a buffet for 80 people and the basics of food hygiene. There are few pictures, and they are mostly pretty useless for the basic home cook - 3 ways to present apple flans?

Black & White Shortbread

I had a craving for shortbread, and I had some chocolate left over from the stall that needed using up. I love making shortbread, as it uses very standard store-cupboard ingredients. It's ideal for late night baking sprees when you can't be bothered to go to the shop. It's also easily jazzed up by whatever ingredients you have lying around (I'm quite a fan of citrus and herbs).

Two-tone Shortbread

As the chocolate helps seal in the moisture, these keep really well. Be careful not to leave them in a warm place, as the chocolate will melt. While this won't affect the taste, they might become a bit blotchy looking. The rice flour helps to keep the texture really "short", but if you don't have any, you can substitute it for more plain flour.

Black & White Shortbread (adapted from Leith's Cookery Bible)
Makes about 8

110g butter
55g caster sugar
110g plain flour
55g rice flour
100g white chocolate
100g dark chocolate

1) Preheat the oven to 170C.
2) Thoroughly mix the sugar and butter together.
3) Add the flour, and gently knead to make a smooth dough.
4) Roll out the dough on a floured surface, to about 5mm thick.
5) Use a biscuit cutter to cut out large circles. Reroll the scraps until you have 8 biscuits.
6) Put the biscuits on a tray, and chill in the fridge for 30 minutes.
7) Bake in the oven for 20 minutes. They should be starting to turn golden.
8) Cool on a rack.
9) Melt the white chocolate in a small pot. Use a pot that the biscuits will only just fit in to, as you want it to be as deep as possible.
10) Line a baking tray with greaseproof paper. Dip the biscuits halfway in the white chocolate, and place them on the paper to cool. Put the tray in the fridge if your kitchen is warm.
11) Once the white chocolate has hardened, repeat steps 9 & 10 with the dark chocolate.

Wednesday, 10 March 2010

Onion Soup with Cheddar Croutons

Up to the age of about 15, I was a bit of a fussy eater. I would often decide what to eat in restaurant by ruling out all the dishes that contained things I didn't like, leaving a choice of only one or two dishes. I got away with being fussy, because I was comparatively normal compared to my siblings. At least I ordered something from the menu. My brother would just demand new creations. Pizza Express was the restaurant of choice as they would happily make a pizza with no tomato, extra ham and extra cheese. I always ordered Mushroom or La Reine. ALWAYS.

Eventually I got bored of this and started eating like a normal person. I even went to the other extreme, picking the thing on the menu that I thought I would least like, just to get over the fussiness. I knew I'd conquered it the day I ordered a Four Seasons pizza (Olives! Capers! ANCHOVIES!)

However, the one fussiness that I couldn't seem to shake was cheese. Mozzarella, cream cheese and Boursin were the only cheeses I'd eat, and only then when combined with other ingredients, preferably strong enough to mask the flavour of the cheese. I remember a family holiday in France, where a particularly insistent waitress asked if I wanted to share a cheeseboard with my parents. No amount of reasoning in English would dissuade her, but a firm "Je deteste le fromage" got the message through. On a field trip at uni we were served macaroni cheese, and just the smell of it made me want to heave.

Onion Soup with Cheese Crouton

I still want to get over my dislike of cheese. I'm slowly getting there. I'm usually fine with cheddars, brie and mild goats cheese. Parmesan and blue cheese still freak me out, but maybe one day I'll get there.

I thought onion soup and cheesy croutons would be a good way to introduce cheese into my diet. I went with a recipe from "Roast Chicken and Other Stories" by Simon Hopkinson, even though I was initially skeptical of pureeing the soup and adding cream. I really liked the tanginess of the vinegar and the wine, and a crouton added interest to the otherwise boringly silky texture.

Smooth Soup and Crunchy Crouton

Onion Soup (from "Roast Chicken and Other Stories")
Makes 4 portions

3 large onions
110g butter
50ml white wine vinegar
250ml dry white wine
600ml chicken stock
300ml double cream

1) Chop the onions into fairly small pieces. Sweat them in the melted butter with salt and pepper in a covered saucepan on a very low heat. After about an hour, they should be very soft and mushy but not coloured.
2) Add in the vinegar, and simmer until it is almost completely evaporated.
3) Add the wine, and reduce by two thirds.
4) Now add the chicken stock. Bring the soup to a simmer and cook gently for 30 minutes.
5) Puree the soup, and return to the heat. Stir in the cream, and reheat the soup, but do not boil. Check the seasoning and serve with a toasted cheese crouton (or 4).

Wednesday, 17 February 2010

Spiced Apple Compote with Buttermilk Pancakes

I am possibly the least sporty person ever, and I can name the sporting events I follow on one hand: The Boat Race and the Winter Olympics. (I don't think Dancing on Ice counts as a sporting event.) I've been to a rugby game at Murrayfield a couple of times, but I just don't get sport.

I attempted to stay up for the opening ceremony of this year's games in Vancouver, but there was no way I was going to make it. So instead, I decided to watch the highlights while tucking in to a Canadian themed breakfast.

Buttermilk makes all things better and pancakes are no exception. That magical acidity reacts with the heat, flour and eggs to get things really light and fluffy. Buttermilk is traditionally the leftover liquid from churning cream in to butter, but most stuff you can buy on the high street is made by adding bacterial cultures to milk. You should be able to get buttermilk at any large supermarket, farm shops, delicatessens or healthfood stores. However, if you can't find it, you can substitute it for milk soured by 1 tablespoon of lemon juice or white vinegar per 250ml of milk. I've also subbed plain yogurt diluted with milk to a thick pouring consistency, with similar results.

Buttermilk Pancakes with Spiced Apple Compote

Normally I'd want these pancakes with berries and yogurt, but fresh berries just don't seem right in February. Instead I made simple spiced apple compote to go with my pancakes. The spices give it a warmth, and I used vanilla sugar to give the apples a bit of extra oomph.

Spiced Apple Compote
Serves 2


2 eating apples
A good lump of butter
2tsp cinnamon
0.5tsp cloves
4tbsp vanilla sugar (alternatively use caster sugar and a dash of vanilla extract)

1) Melt the butter in a saucepan over a low heat, and peel, core and roughly chop the apples.
2) Add the apples to the melted butter, along with the spices and sugar. Stir everything up, and cover with a lid.
3) Gently cook the apples for around 10 minutes, stirring occasionally. The butter should start to brown, and the apples will be soft enough to cut with a spoon, but still retain their shape.

Spiced Apple Compote

Canadian Buttermilk Pancakes Makes about 12 medium pancakes

150g plain flour
130ml buttermilk
0.5tsp baking powder
pinch of salt
3 eggs

1) Sieve the flour, baking powder and salt in to a large bowl, and make a well in the middle.
2) Dilute the buttermilk with 75ml water and pour this in to the well. Gently whisk in to the flour.
3) Add the eggs one by one, whisking until you have a thickish smooth batter.
4) Heat a large non-stick frying pan on a medium high heat, and coat with vegetable oil or butter.
5) Pour a small ladleful of batter into the pan, and cook for around 1 minute on each side. The pancake should puff up and be nicely browned.
6) Serve immediately.

Saturday, 13 February 2010

Goat's Cheese & Onion Tartlets

I've been doing a cake stall in the evenings at a late night shopping event, and have found the savoury items go down just as well as the sweet. Although I love the bacon scones, I wanted something vegetarian too.

Goat's cheese seemed like a good idea, as did caramelised onions. I couldn't find a recipe I liked, so I winged it a bit. I thought this was one of the simplest recipes I make for the stall, although having typed it all out, it begins to seem quite complex! There are quite a few steps, but they can be done in stages over several hours.

Goat's Cheese & Onion Tartlets

I think they taste nicest served fresh out the oven, but they've had good feedback on the stall when I've been serving them at room temperature. They also keep well and will happily be reheated.

Goat's Cheese & Caramelised Onion Tartlets
Makes about 24

170g plain flour
55g butter
30g lard (use vegetable lard if making this vegetarian)
2 onions
150g goat's cheese
A little olive oil
Salt & Pepper to season

1) Begin with the pastry. Rub the butter and lard in to the flour along with a pinch of salt, until the mixture looks like coarse breadcrumbs.
2) Add in 2-3 tablespoons of cold water, and gently mix to form a dough. You may need to add a bit more water, but the pastry dough should be quite flaky and dry.
3) Wrap the pastry in clingfilm, and chill it in the fridge for at least 2 hours. Overnight is better.
4) Once the pastry is suitably relaxed, flour your work surface, and preheat the oven to 180C.
5) Roll out the pastry to about 3-4mm thick. You might need to knead it a little before it rolls properly.
6) Using a large biscuit cutter, cut out circles of pastry. Gently push these into a non-stick muffin tin, to form the tartlet cases. Reroll any scraps until you have 24 cases. (If the kitchen is warm, or the dough is getting too soft, chill the formed shells in the fridge for 30 mins or so.)
7) Place a small square of foil or greaseproof paper over each tartlet shell, and fill it with baking beans. Bake it blind for 7 minutes, remove the beans, and bake for a further 5 minutes. Remove the shells from the tin and cool on a rack.
8) Meanwhile, finely chop up the 2 onions. Cook them with some salt and pepper in a covered pan on a very low heat for about 30 minutes. Stir occasionally.
9) Once the onions are cooked, put 1 tablespoon of onion in to each tartlet shell. Thinly slice the goat's cheese and top off each tartlet with a slice of cheese and a sprinkle of black pepper.
10) Put all the tartlets on a tray, and bake for a further 15 minutes at 180C.

Monday, 25 January 2010

Hot Spiced Mead - A Winter Warmer Cocktail

Although the German market in Edinburgh disappeared long ago, the Highland market was around until New Year. When we visited on New Year's Day, we all had sore throats from the partying the night before, as well as sore heads. After some tasty burgers from Well Hung & Tender, we found a stall selling hot mead, which we hoped would be soothing as well as restorative.

It was indeed both, and quizzed the girl behind the counter for the ingredients. Mead, wine, honey, sugar, apple juice and spices were in there, but she wasn't sure of the quantities.

I'd forgotten about it until the other day, when perusing the alcoholic offerings of the local deli in search of something to cheer me up in the darkest days of January. Some mead was purchased, quickly spiced, heated and drunk.

Cinnamon, cloves, star anise, mace.

I left out the apple juice, but reduced the alcohol content by gently simmering the drink for a minute or so before serving. I used a similar selection of spices to that of mulled wine - cinnamon, cloves, star anise and mace. Without the apple juice, I substituted a good squeeze of lemon to make it a bit fruitier. Annoyingly, it was only after I finished drinking that I thought I should have put a shot of Cointreau in there to get a zesty edge to the flavour.

Hot Spiced Mead

Hot Spiced Mead
Serves 1 - but can be easily multiplied to make more, you don't need to add more spices unless you are making more than 4-5 portions.

2.5 ladles of mead
1.5 ladles of white wine
0.3 ladles of sugar
1tbsp honey
good squeeze of lemon juice
1 star anise
1 cinnamon stick
4 cloves
1 blade mace

Place everything in a saucepan, and stir to dissolve the sugar and honey. Simmer the liquid gently for 30 secs to soften the alcoholic impact (but don't boil it all off!) and serve.

Monday, 18 January 2010

Spicy Bacon & Cheddar Scones

If I were the Pioneer Woman, I'd tell you this recipe makes my skirt fly up. If I was Deb of Smitten Kitchen, I'd tell you you'll regret every minute you wait to make this recipe, and then post a picture of my cute baby. If I worked for Word Of Mouth, I'd say that I subbed Cheddar for Gruyere as I was staying true to my working class roots. If I was living in London, I'd worry about whether I should reveal that half the ingredients were PR freebies, start writing about unctuous pork, and then get so stressed out that I'd just blog about going to Tayyabs for dinner instead.

It's not skirt wearing weather, I don't have a cute (or plain, or ugly, or any type at all) baby, I'm not that working class, and all of the ingredients were bought with my own money. So there.

I've been doing an after work craft market in a bar, so I decided to make some savoury items to capture the crowd who aren't up for a pint of beer and a chocolate cupcake. After sifting through a huge pile of cookbooks for inspiration, I settled on the spicy bacon & gruyere scones from 'Bake' by Rachel Allen.

Bacon & Cheddar Scone

I changed from gruyere to cheddar for purely economic purposes. Baking is a fairly low margin product. When you add up the number of hours of labour I put in, minus costs, I'm lucky to make anywhere near minimum wage. Every penny counts in this game. Although I did buy free range bacon, because I'm not that cheap.

The recipe was fairly simple, although I was worried that the mixture was looking rather dry after adding the butter. I'd forgotten that buttermilk came in later, which took it to the other extreme of being too wet. The recipe says not to knead the dough, which is hard, as it doesn't seem to want to come together. Although the dough is quite sticky, it is fairly robust. This makes it quite easy to scrape the scones off the counter and on to the baking tray without them falling apart.

They rose really well, and had that stretchy look around the edges that is the mark of a good scone. Most of the time I don't try more than the crumbs of stuff I've made for the stall. Eating the produce is not great hygiene, as well as depriving me of much needed profit. However, there was a small blob of dough leftover that wasn't really big enough to sell, so I baked that as well to try it.

They smelt fantastic coming out of the oven, and I could barely wait for them to be cool before eating the mini one. The outside had a bit of crunch, while the inside was soft and airy (buttermilk is one of the best ingredients for airy baking, it's just a bit tricky to find!). The cheese flavour was clear, with a subtle spicy tingle from the cayenne. When you hit a lump of bacon, it went to the next level of deliciousness. The pre-cooking followed by baking meant that the bacon was crispy, and the fat had rendered in to the surrounding dough. My limited grasp of English vocabulary is not enough to describe how great these scones are.

Airy texture, with bacon peeking out.

Spicy Bacon & Cheddar Scones (From 'Bake')
Makes 10-20 depending on cutter size

450g plain flour
1 tsp baking soda
1 tsp cayenne pepper
1 tsp salt
30g cold butter
110g bacon, cooked and finely chopped (this cooks down to less than 110g, use more if you love bacon)
110g cheddar, finely grated (use gruyere if not being cheap)
1 egg
375ml buttermilk (or milk)

1) Preheat oven to 220C, Gas 7
2) Sift the flour, baking soda, cayenne and salt in a large bowl. Rub in the butter until it looks like fine breadcrumbs. Mix in the bacon and cheese.
3) Combine the buttermilk and the egg in a jug, and add it to the dry ingredients.
4) Stir until the mixture forms a dough. Turn it out on to a floured surface, and gently fold to fully incorporate all the ingredients.
5) Roll the dough out to about 2cm thick, and cut out the scones. I used a 3inch cutter to make monster scones, but you could use a smaller cutter, or even cut the dough in to squares.
6) Place the scones on a floured baking tray and bake for 10-16 minutes (depending on size). Cool on a wire rack for as long as you can bear, and then eat warm.

While these are best eaten straight away, they can be reheated at 160c for 6 minutes, although this does make the outside a little too crunchy. Sprinkle with water before reheating to minimise this.

Thursday, 3 December 2009

Chestnut And Ricotta Pancakes

This post marks the first birthday of this blog! It's been a bit of an up and down year for me, and I guess this is reflected in the blog a bit. There was the bit in early 2009 where I barely posted at all, as I struggled to recover from a respiratory infection and rushed to complete my final year project. I did quite well on the posting in summer, where there were plenty of friends and flatmates around to eat what I made. Now I only have one flatmate, who doesn't like cake, and it's too dark to take proper photos. Perhaps that is why I haven't posted as frequently as I would have liked recently.

Anyway.

Last night there were chestnuts and ricotta in the fridge. I was planning to make something savoury, but they weren't inspiring me. Jess on Twitter suggested blending it with honey to make a spread. This sounded vaguely more promising.

Chestnut and Ricotta Pancakes

The first lesson I learned was that my 4 year old, £15-from-Argos-Blender is a bit crap. It utterly failed at blending, and instead created some watery chestnut honey paste surrounded by whole chestnuts and lumps of ricotta. It does rule at banana and peanut butter smoothies though.

The second lesson was that chestnuts are massively enhanced by honey. I still don't get ricotta though, I don't like the blandness nor the texture.

I made some pancakes for lunch today, and decided that chestnut ricotta honey mish mash would be the perfect filling.

Chestnut + Honey + Ricotta = Tasty

To make the pancakes, I whisked 120g plain flour with an egg and 100ml milk. Once this was a smooth paste, I added another 200ml milk and a small spoonful of sugar. It would have been a good idea to add some vanilla essence as well, but I couldn't be bothered to get it out of the cupboard. Oh well.

After I'd fried off a couple of successful pancakes (why does the first one always fail?), I filled them with the ricotta and chestnut mix, and dusted with icing sugar.

Saturday, 21 November 2009

Orange and Rosemary Shortbread

It's taken me ages to write this post, just because there has been absolutely zero daylight in Edinburgh to take pictures with. It's so depressing that there is still a month left where it will just get darker. The curtains are shut and the lights are on by about 3pm most days. So, prepare yourself for some very dodgy photos in the coming months, and I apologise for my shaky-cam poor lighting. Brace yourselves for winter.

Anyway.

I've been thinking about the Lemon Thyme biscuits I made earlier in the year a lot lately. I wanted to make them again, but they didn't seem suitable given the cold and dark. Christmas doesn't seem like a lemon time of year. Oranges and clementines are more festive feeling to me.

Orange and Rosemary Shortbread

I swapped out the lemon zest for orange, and finely chopped a couple of sprigs of rosemary. I rolled the dough thicker than I would normally. It seems more appropriate to have a massive hunk of shortbread rather than a daintily thin slice. For some of the larger biscuits, I made a hole in the top so it could be used as a tree decoration.

Orange and Rosemary Shortbread Tree Decorations

The shortbread was crumbly and buttery, and the orange flavour shone through. The rosemary wasn't very strong, so added a pleasant herby aftertaste rather than a massive kick. I decorated the biscuits with an egg white wash and a sprinkle of granulated sugar, to create a frosty effect. Without the sugar topping, it was a quite grown up, but the extra sweetness made the appeal more universal, so perhaps more suitable for feeding to less refined palates! They are incredibly moreish though, so watch out...

Orange Shortbread with Rosemary
Makes lots

225g unsalted butter, softened
150g granulated sugar
zest of 1 orange
1 tsp salt
2 tsps finely chopped rosemary
1 egg, separated (save the white for the glaze)
275g plain flour
2 tbsps orange juice

GLAZE
Granulated sugar

1) Cream together the butter and sugar until light and fluffy.
2) Add in the orange zest, salt and rosemary, combine thoroughly.
3) Separate the egg, saving the white for glazing. Add the yolk into the biscuit dough mix.
4) Add the flour and orange juice. Once a dough starts forming, knead gently on a floured surface.
5) If the dough is sticky at this point, add more flour, a sprinkle at a time.Wrap the dough in clingfilm, and chill for at least an hour.
6) Preheat the oven to 180C, and line a baking sheet with greaseproof paper.Roll the dough out to 5mm thick, and cut circles out (I used a 2 inch diameter cutter). Keep gathering the scraps and re-rolling until you have about 40 biscuits.
7) Brush the biscuits with egg white, and then sprinkle with granulated sugar.
8) Bake for 15-18 minutes, until the biscuits are just turning golden brown at the edges.Cool on the tray for 1 minute, then move to a wire rack to finish cooling.

Monday, 9 November 2009

Italian Bread

After taking T's brother and his girlfriend to a couple of restaurants over the long weekend, we decided that Saturday night should be a bit quieter (and cheaper!). We decided on a games night, with pizzas, beers, and perhaps even a bit of X-Factor thrown in.

I wanted to make something for people to nibble on, that was a bit more interesting than a bowl of crisps or nuts. Riffling through Leith's, I found a recipe for "Italian Bread". I'd also seen this post on Wild Yeast, which made me really want focaccia.

Italian Bread served with olive oil

The recipe itself is pretty quick to pull together, although the kneading time of 8 minutes is a bit of a killer if you are lacking in upper body strength. I mixed in a handful of chopped sun-dried tomatoes and some fresh basil, but rosemary, cheese or olives would also be tasty.

My two food fears are baking with yeast and deep-frying. Luckily this recipe didn't involve deep frying, but it did involve yeast. The last few times I've used yeast, I've seemed unable to get any rise out of it. However, on this occasion, an hour in a previously warmed oven seemed to do the trick.

Italian Bread flavoured with Sundried Tomatoes and Basil

I was initially a bit disappointed, as the bread was quite hard and crusty. It was still tasty, but it wasn't as soft as I was expecting. Left overnight, it softened up a bit, but still was a bit too tough and crusty for my liking.

Slightly too crusty.

I think if I was to make this again, I'd give the Wild Yeast recipe a go instead. It's fairly similar to the Leith's one, but the photos look less crusty so the small tweaks obviously make a difference.

Italian Bread (Leiths Cookery Bible)
Makes 1 large loaf

30g fresh yeast (I used a 7g sachet of quick yeast)
225ml warm water
450g strong flour
2 tsp salt
4 tbsp olive oil
coarse salt to sprinkle over the top

1) Dissolve the yeast in the warm water.
2) Put the flour and salt in a large bowl and make a well in the centre. Mix in 2tbsp of the oil and the yeast mixture.
3) Once a dough in formed, knead well for 8 minutes. (After kneading, I added a handful of sundried tomatoes and some chopped basil.)
4) Roll the dough out until it is about 2cm thick. Place on to a greased baking sheet and cover with greased clingfilm.
5) Leave the dough to rise in a warm place until it is soft and fluffy looking. Preheat the oven to 200C
6) Make some indentations in the dough with your finger, and drizzle over the last 2tbsp of oil. Sprinkle over coarse salt, or you could use woody herbs like rosemary.
7) Bake for 20 minutes, then remove from the tray and bake directly on the oven rack for a further 10 minutes.

Thursday, 5 November 2009

Korova Cookies

This is a bit of a landmark here - my 100th post! Although really two of them don't count as the introduction and links should be on pages rather than posts... but anyway. I have filled this blogger text box out 100 times. Who knew I was that dedicated!?

T's brother and his girlfriend are visiting us this weekend. I have a bit of a reputation amongst T's family for being a baker, so I knew I had to make something to welcome them, but at the same time I didn't want to do anything too crazy that they would feel obliged to eat. I settled on Dorie Greenspan's Korova cookies (sometimes also known as "world peace" cookies - the idea being that if these were handed out there would be no more need for war). How could anyone resist buttery chocolate biscuits studded with chunks of dark chocolate?

Korova Cookies

I made the dough for these the night before, and left it to rest overnight. It was hard to resist baking some of them straight away for a midnight snack. In between cleaning the flat, I sliced off 12 rounds and baked them. Within minutes, the flat smelt like melting chocolate. Obviously I had to check they were ok, and had eaten 2 while they were still warm. By the time T had picked up his brother from the station, I'd eaten 7 of the of the 12 I'd baked. In the introduction, Dorie warns you not to make them when you are alone, and she is right. They are dangerously addictive.

Crumbly and crispy

So I baked another batch, and it came out of the oven just as T and his brother came through the door. They are crispy and just chewy when cool, but when they are warm, the crumbly biscuit and the gooey chocolate are sublime. The hint of salt and the dark chocolate also make them a little more grown up than your average cookie.

If you like the sound of these, Deb of Smitten Kitchen has already typed the recipe up rather well.

Sunday, 1 November 2009

Cappuccino Cupcakes

I decided that making the millionaire shortbread from "Red Velvet & Chocolate Heartache" was not a good test of the book, as it is about the only recipe in there that doesn't use some kind of vegetable in place of butter. The anthropomorphic descriptions in the book are not particularly useful, so it took me a while to decide on the cappuccino cupcakes with sweet potato.

Cappuccino Cupcakes (with Sweet Potato)

After creaming eggs and sugar, finely grated sweet potato is mixed in. The other main difference between this recipe and a standard cake is that the flour is replaced by rice flour and ground almonds, making this gluten free as well as fat free (I know there are fats in nuts, eggs and sugar, but there isn't the massive hunk of butter that starts off most cake recipes).

Before baking, the batter tasted more like carrot cake than coffee cake. Even though I'd added more coffee essence than the recipe suggested, the flavour was quite weak. After baking, I tried one of the cakes without any icing. Although the coffee flavour was still weak, the cake was moist and fluffy, and the sweet potato had melted away. I was quite impressed that such a healthy set of ingredients could produce such a good example of cake.

The suggested icing was a modified buttercream - 1 part butter, 1 part mascarpone and 4 parts icing sugar. Again I put in a bit more coffee essence than recommended to ensure that the icing made up for the lack of coffee flavour in the cake. While I like the creamier texture that mascarpone adds, I find that it produces quite a loose icing, which doesn't pipe as well as plain buttercream. I tried to practice icing roses on the top of these cakes, but as the mixture wasn't stiff enough they collapsed a little. I think my technique is improving though.

Cappuccino Cupcake with "Rose" Icing Pattern

I am generally not a fan of "fun-free" food, but these were quite impressive. I don't think I'd make them regularly for myself, but as I know a few people who are watching their weight or gluten intolerant, it's good to have a recipe to suit them too.

Cappuccino Cupcakes (Harry Eastwood - Red Velvet & Chocolate Heartache)
Makes 12

2 eggs
160g caster sugar
200g peeled and grated sweet potato
100g rice flour
100g ground almonds
2tsp baking powder
1/4 tsp salt
3tbsp coffee essence

Icing
50g unsalted butter
200g icing sugar
50g mascarpone
2tsp coffee essence

1) Preheat the oven to 180C, and line the muffin tray with paper cases.
2) Whisk the eggs and sugar until pale and fluffy. Whisk in the sweet potato, followed by the rice flour, grated almonds, baking powder and salt. Finally stir through the coffee essence.
3) Fill the cases and bake for 20 minutes. The cakes may look a bit like muffins at this point but don't worry.
4) While the cakes cool, whisk the butter for the icing until it is smooth. Then add 100g of the icing sugar and beat in to the butter to form a thick paste. Whisk for longer than you think you need as it is vital the butter and sugar are properly combined.
5) Add the mascarpone, coffee essence and remaining 100g of icing sugar. Mix with a spoon until you get a smooth icing (don't use the electric whisk here, it'll destroy the texture of the mascarpone.) Keep the icing in the fridge until you are ready to use it.
6) Once the cakes are cool, top them with the icing.

I'm keeping my cakes in the fridge, as the mascarpone won't survive at room temperature very long. However, if you plan to eat these within a day or so, they should be fine to store in a normal cake box.

Tuesday, 13 October 2009

Scotch Eggs

A while back, my dad spent quite a while telling me that the perfect boiled egg was all about heating the white to a certain temperature, and that if you kept it at that temperature, it would never over-cook. As I've been reading more about the science of cookery, I've found that my dad was correct - an egg cooked at 65C will have a set white and a creamy yolk.

I've also been intrigued by the rise of the scotch egg from Greg's abomination to acceptable gastro-pub fare. They always seem to have a runny yolk, so maybe it was time to apply science to snacking.

Here comes the science bit!

Egg Number 1
Initially I thought the easiest way to keep an egg at 65C without using a fancy-pants waterbath (I don't even have enough worktop space to justify a stand mixer, let alone an water circulator) was in the oven. Although the oven was labeled 60C, it didn't seem particularly hot in there. I could comfortably put my hand in the oven and move the racks around without it burning. The oven thermometer starts at 100C, and the needle was hovering just under this, so I left an egg in there for about 45 minutes.

After the egg had cooled down a bit, I cracked it open. It wasn't firm enough to peel and so in that respect was an epic fail. However, I scooped the egg out of the shell and ate it, and it was amazingly delicious. The yolk was runny and rich, and the white was cooked but still creamy and soft. The only way it could have been better was if there had been some buttered soldiers to dip in it.

Egg Number 2
Next up I decided to try a water bath. Using a sugar thermometer, I heated a saucepan of water to 65C. I was surprised to find that by putting my hob on the lowest setting, that I could maintain this temperature very easily. I occasionally added a little cold water if the temperature started rising, but I only had to do this about twice in the hour or so that I cooked the egg for.

I cracked it open, and initially was quite pleased - the white was set enough to be able to peel the egg, but still wobbly enough to suggest that the yolk would be runny. However, as I continued peeling, it became obvious that the egg was far too fragile to put in to a scotch egg. As I took off the last pieces of shell, the egg collapsed completely.

By some fluke of science, I'd created an inverted egg. The yolk was completely set, and was like a little orange pebble in a pile of white gooey jelly. I ate this egg too. It wasn't as tasty as the first one, but the yolk, while set, was still moist. I'd be quite interested in using this method again to create set yolks that could be used as a garnish or as a component in a dish.

What had happened was that the yolk proteins had set at 65C, as had some of the white proteins. However, one of the proteins in the yolk doesn't set until 80C, so this egg obviously had a higher ratio of this high temperature protein and thus the white was still quite runny.

Egg Number 3
By this point, the leftover sausages that I was planning to use for the scotch eggs were dangerously close to their use-by date. So I wimped out and put two eggs in a cold pan of water, brought them to the boil, and simmered for 8 minutes. They were pretty standard hardboiled eggs.

In future, I think I'd go for a two stage process to find the perfect peelable boiled egg. First a lovely bath at 63-64C, to firm up the white, but keep the yolk runny. Then a quick dip (1-2 minutes) in a 90C bath to firm out the outer layer of the white, so it's possible to peel it without it falling apart. Then maybe a quick shock in iced water to ensure they don't over cook. Hmmm, several different baths and a peel, sounds like a day at a spa hotel.

Baked Scotch Egg

The actual scotch eggs were fairly simple to make - mash up a load of sausage meat (about 2 sausages per egg) and wrap this around the boiled egg. Then roll the egg in some seasoned flour, some beaten egg, and then breadcrumbs. I seasoned the breadcrumbs with a little cayenne pepper to give them a bit of a kick. As you can see from the photos, my wrapping wasn't entirely even, but that wasn't too much of a problem.

Uneven but tasty

As with most Scottish items, a proper Scotch Egg is deep fried. I didn't really want to do this, so I baked them at 200C for 30 minutes, and finished them off in the frying pan to get the breadcrumbs crispy. I think the sausage meat insulates the egg quite well, as when I finally got to scoff the eggs they yolk was still quite moist and not overcooked. They were also delicious later on when they'd been chilled for a while. Even though I'd baked them, you could feel the cholesterol destroying your arteries as you chewed. Perhaps this is not the recipe to repeat until I perfect it...

Sunday, 6 September 2009

Chocolate Chip Cookies

I'm still in limbo between flats, and I'd sworn off baking until we reached the new flat. However, with T passed out on the sofa watching Jonathan Ross, and this month's issue of Delicious already read, I was bored and the kitchen was calling.

Raiding the cupboards showed there was some flour, baking powder (no idea how T managed to obtain that, I must have bullied him in to buying it at some point) and a bar of chocolate left over from the chocolate terrine. I didn't have any cake tins or a baking sheet, only a roasting tin, so today was not the occasion to attempt the Daring Baker's back catalogue.

Instead I opted for a classic chocolate chip cookie, with hefty chunks of chopped chocolate. I reappeared from the kitchen 30 minutes later with cups of tea and a couple of freshly baked cookies. Not the most exciting Friday night, but certainly a tasty one.

Chocolate Chip Cookies

You can also save this dough in the fridge for a few days, so I baked up the rest of these this morning for elevenses.

RECIPE
115g softened butter
100g brown sugar
25g caster sugar
1 egg
1tsp vanilla extract
215g plain flour
1tsp baking powder
pinch salt
110g chocolate (cut in to chunks or chips)

Makes 24 cookies

1) Preheat the oven to 190c (Gas Mark 5)
2) Cream the butter and sugar until smooth, then add the egg and vanilla extract.
3) Add in the flour, salt and baking powder and briefly mix to form a dough.
4) Add in the chocolate and mix again to distribute the chips throughout the dough.
5) Divide the dough into 24 balls, and place on a greased baking sheet, lightly pressing each ball to flatten it in to a cookie shape. (At this stage you can store any extra dough in the fridge for a week or the freezer for a month.)
6) Bake for 10-12 minutes until golden. Transfer to a wire rack until cool. (If your cooling rack is in a self-storage facility, you can use the rack from a roasting tin that you found at the back of a cupboard)

Sunday, 23 August 2009

Thai Steamed Mussels

One thing I am genuinely good at in the kitchen is dealing with left-overs. Although I ignore the golden rule of planning a weekly menu, I always check out the fridge before deciding what is for dinner that night. This has an extra bonus when you have flatmates, as often there are things left in the fridge and cupboards that they no longer want that can be snaffled.

Minimising waste is one of the rules of "Economy Gastronomy", a new show on BBC2. The show is definitely not aimed at me, as I've spent the last four years perfecting the art of eating well on a small budget, but I do enjoy some of the recipes. I also get a bit of schadenfreude off some of the more idiotic meal plans of the participants, but that just probably makes me an evil person.

One recipe that did catch my eye was the Thai Steamed Mussels. I love mussels, and I love Thai food too. When I found myself looking at a fridge containing half a can of coconut milk, it seemed like a good idea.

I made my own red curry paste, using a selection of jars from the fridge. The recipe is probably not all that authentic, but it tasted pretty good, with the right balance of heat, sourness and aromatics.

2 cloves of garlic,
2cm of ginger
1tsp lemongrass (either chopped or pureed)
1tsp tamarind paste
1 heaped tsp Thai shrimp chilli paste
3 small kaffir lime leaves (chopped, and soaked if using dried)
1tsp lime zest
1 red chilli (chopped)
1 spring onion (chopped)
Splash of groundnut oil

Thai Red Curry Paste

Basically, mash everything together with a pestle and mortar. I find it easiest to add the solid ingredients first and then start adding the pastes and liquids, but as long as it all ends up in the bowl it shouldn't matter too much. It takes quite a bit of pounding and grinding to get it all looking smooth, so put something good on tv or the radio and keep going. The recipe above makes enough for 3 or 4 large spoonfuls, and will keep in the fridge a couple of days if you don't use it all in one go.

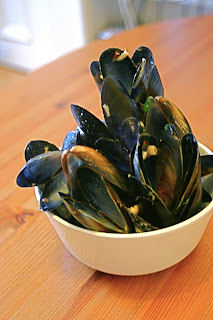
Thai-Spiced Steamed Mussels

The mussels themselves were easy to make, although I was worried that I might give myself food poisoning by putting a bad one in the pot by mistake. I sorted through the bag, and only 2 failed to close when tapped. They'd also been debearded and scrubbed, although a couple still had the remains of a beard which I pulled out.

As I knew it would be a matter of minutes once the mussels went in the pan, I did a full mise en place for once. Chillies and garlic were chopped, and the spring onion and coriander garnish readied. I mixed up a jug of coconut milk, red curry paste and chicken stock, to pour over the mussels. (It was actually half an Oxo cube and some boiling water, but I didn't see the point of defrosting the real chicken stock for 75mls worth.)

5 minutes later, I was tucking in to a massive heap of mussels, with the fragrant broth awaiting me at the bottom of the bowl. I also had got a mini baguette earlier in the day, and used this to mop up the juices. Lovely!

All gone!

My main criticism would be that there was not much kick to this dish. I guess as Economy Gastronomy is aimed at families they didn't want to make it too spicy for the kids (but which kids do you know that would eat a plate full of mussels? I didn't go anywhere near seafood until I was in my late teens.) However, this would be easily solved by using more red curry paste, or making your own *very* spicy version.

I really enjoyed this meal, and it was very quick to make if you don't have to debeard and clean the mussels yourself. The mussels were not that expensive (£5.60 per kilo) but probably a little more than I would spend on one meal normally. I was also a bit put off by the lack of fruit and veg, but I guess if you had a healthy pudding or starter and a glass of juice that would compensate for the lack of roughage. However, it felt very indulgent and luxurious, and in total probably only cost me about £3.50. Bargain! A perfect way to use up leftovers!

Wednesday, 5 August 2009

Festive Cocktail - Elderflower Martini

Although the Edinburgh fringe doesn't start officially until the 7th August, the city is already in full festival mode. Many shows are doing previews, and I'm off to a couple tonight. I've also got tickets for shows for the next few days, my mission this year is to go to at least one show a day!

A big problem with the Fringe is that there is just so much to see. I've had a programme guide for a couple of weeks, and picked up Fest magazine too, but I am still none the wiser about what I want to see.

While contemplating the hefty tome that is the full Fringe listings, I've often been sipping on an elderflower martini. I first tried this drink at the bar where my flatmate works. I think it was a special, as I haven't seen it there since. Although I know a proper martini shouldn't have a non-alcoholic mixer as it's main component, I can't quite remember what this was called in the bar, and googling doesn't bring up a similar recipe. I'd watched the barman quite closely as he'd made the drink, so although I can't remember the name, I can still guess at the recipe!

You will need these ingredients

Elderflower Martini - per person:
25ml sweet vermouth
25ml elderflower cordial
125ml cloudy apple juice

Put everything in a cocktail shaker, with plenty of ice cubes. Shake it up until the outside of the shaker gets cold and misty.

Cold and Misty

Strain the drink in to a glass and enjoy! It's not particularly alcoholic, so it's refreshing while still having a bit of a kick. I am a massive fan of gin and other "aromatic" type drinks, so I loved the floral flavour of the elderflower mixed with the herby tones of the vermouth.

Time to study the options!

There's a couple of other summer drinks I've been drinking a lot lately, so watch out for those recipes soon...

Click here for more Martini information - Martini on Foodista

Sunday, 28 June 2009

Tonkatsu with Japanese-ish Salad

In my handbag I have a red notebook. In the notebook are various scrawls and doodles that categorise my life at any given time. The current notebook has a few shopping lists, a pictorial representation of our holiday in Florence, and a record of how far I ran in January. It also has a list of hard-to-find ingredients I am always on the lookout for.

The two items that refused to be knocked off the list were freeze-dried raspberries (Ideally powdered, but I'll take whole. I would also be tempted by freeze-dried strawberries.) and panko breadcrumbs. I'd tried the Thai store in Bruntsfield, but to no avail (they did have kaffir lime leaves though, so that got crossed off the list). Lupe Pintos was also lacking on this occasion.

The area of Edinburgh I live in is apparently the "Chinatown" area, although you wouldn't know it. The only clue is Hot Hot Chinese, an advice centre for elderly Chinese, and the Chinese service at the local church. The evidence is there, but there are no dragon arches and bilingual signs like some of the more established Chinatowns around the world. I came to the conclusion that if I was to find panko, it would probably be available within a 10 minute walk. Googling around, I found there was a Chinese supermarket hidden on Lauriston Place at the junction with Tollcross.

I headed down there the next day. Within a minute I'd found not one, but two varieties of panko. Yay! I went for the one that was cheaper, I think because it didn't have English instructions on the packet. There were loads of other weird ingredients in there, plus a good selection of utensils and woks. There was also a large section dedicated to nearly every brand of pre-made stir-fry sauce you can get. I have never seen so many varieties of Blue Dragon and Sharwoods in one place.

So... On to the actual post!

I had some pork chops in the freezer that I wanted to use, and the only recipe in the Wagamama cookbook that used them was tonkatsu. I've never had this, so I thought I'd give it a go. I promised T "crispy Japanese pork" for dinner, but conveniently forgot to tell him that it would be served on a salad.

Tonkatsu: Slightly out of focus as I was impatient to eat

Overall, I don't think this dish really worked. The tonkatsu was pretty tasty (and it's the first time I've breadcrumbed something where the breadcrumbs stayed mostly on the meat and not in a pile in the pan) and I quite liked the crispiness of the salad too. It's also the first dish on here to feature a mangetout! However, I wasn't convinced by the recommended sauce, a mixture of ketchup and Worcester sauce, although it did taste weirdly Asian given the total Britishness of the two component ingredients.

The main failing was pairing the salad with the pork. Although Wikipedia has just told me tonkatsu can be eaten cold, it felt strange having a lukewarm piece of meat on a freezing salad (all the ingredients except the spinach were kept in iced water to ensure their crispiness).

T was not interested in the salad at all, and I struggled to finish mine. I would probably make it all again, but have it on different plates. The tonkatsu would be really tasty with some stir-fried vegetables or on a ramen soup, while the salad would be better accessorized with some smoked fish and lots of dressing.

I now have a fridge full of daikon, spinach and bamboo shoots and a cupboard full of panko... more Japanese food to come soon I guess!

Japanese Style Salad (adapted from Wagamama Cookbook)
Serves 4 as a side dish, or 2 veg lovers.

2 small carrots, julienned
4 inch chunk of daikon (mooli), julienned
25g mangetout, thinly sliced diagonally
1 green chilli, finely diced
8-9 spring onions, thinly sliced diagonally
a handful of alfafa sprouts
3 handfuls of spinach

1) Once all the vegetables have been washed and chopped, place everything but the spinach in a bowl of ice water for an hour to ensure their crispiness.
2) Using the spinach as a base, artfully arrange the drained vegetables on top.
3) Add the toppings and dressings of your choice.

Monday, 22 June 2009

Dorie Greenspan's Croq-Tele (TV Snacks)

The quest to work my way through the whole of "Paris Sweets" continues with Patisserie Arnaud Larher's Croq-Teles. The name translates as "TV crunches", as they are an ideal substitute for popcorn or crisps. I made the hazelnut version, with ready ground nuts as I don't have a food processor.

Croq-Teles

These little biscuits were deliciously moreish, and the recipe introduction promised "up-front saltiness". However, I found them only a tad salty, and should have added much more salt to get that sweet-savoury taste. I don't know if this is because I have a mild salt addiction, or just the European habit of putting salt in everything! I find "Paris Sweets" an interesting book because Dorie Greenspan often comments on recipes from an American viewpoint. Sometimes I agree with her, and sometimes her comments seem so strange to me! I guess that is as close as I will get to proof that I am more at home in Europe than in the special relationship.

The dough is incredibly dry and crumbly, and reminded me a lot of making shortbread. The mixture barely holds together, so you have to squish it quite hard to get the balls to form.


A Stack of TV Snacks

Croq-Tele (adapted from Dorie Greenspan's Paris Sweets)

75g ground almonds
25g ground hazelnuts
100g sugar
1tsp vanilla sea salt
140g plain flour
100g unsalted butter, cubed

1) Preheat the oven to 180c, and line a large baking sheet.
2) Mix the ground nuts, sugar and salt together in a bowl, making sure there are no lumps.
3) In another bowl, crumble the flour and butter together, either using your fingertips or a pastry blender. The mixture should look like breadcrumbs.
4) Add the nut-sugar mixture, and combine. The dough should come together but be quite fragile. Tip it on to the worktop and squidge it together to form one lump.
5) Pinch of small pieces of dough and form in to rough balls. You should be able to get about 50 cookies from the mixture, so each ball should be about the size of a cherry.
6) If you have a large baking tray, you might be able to fit all of the cookies on, otherwise you'll need to do two batches. They don't spread much in the oven, so they'll only need 1.5-2cm gaps between them.
7) Bake the cookies for between 10-15 minutes. They should be set but not browned.
8) Cool them on the baking tray for 3 minutes, if you pick them up too early they'll crumble.
9) Once hardened, transfer them to a cooling rack. Try not to eat them all immediately!

EDIT: Just found the original recipe and commentary online.

Monday, 13 April 2009

Salted Caramel Mocha Cookies

In Delicious. this month there is a was an advert for a coffee machine which came with an recipe for cappuccino thumbprint cookies. This got me thinking, and I suddenly became obsessed with adapting the recipe to make salted caramel mochas.

I followed the dough recipe pretty closely, only making a couple of changes to the method. It was the filling that really took time and experimentation. I wanted to make a creamy caramel, much like you get inside a Twix or a Mars bar. Using Leiths, and various online recipes, I made four batches of caramel. All of them were rubbish. The first couple burned, even though I was using a sugar thermometer. The second two I was much more careful with, and took them off the heat well before they were anywhere near burning point. I tried stopping one with cream, but instead it just turned in to a giant lump of hard sugar and some slightly dubious looking brown cream. The next batch I used a combination of milk and butter. This had a better consistency, but was a very dark brown and instead of being smooth and creamy, had a weirdly grainy mouthfeel.

4 attempts at caramel meant that I had run out of sugar, clean saucepans and dairy products. My fingers were covered in tiny burns from boiling, spitting sugar, and I was getting frustrated. Why was boiling some sugar so difficult? I was being attentive, monitoring the temperature, and not stirring too much. The part of me that thinks I am a good cook suggested that it was a combination of a dodgy electric hob and a cheap, thin saucepan. The part of me that wants to be a good cook thought I was probably stirring too early, heating too quickly, and getting distracted too easily.

While searching online, I found a recipe for millionaire's shortbread. Looking at the picture, it seemed that was exactly the type of caramel I was looking for. A baking community I posted on also suggested a similar recipe. I noted down the ingredients, and went to bed. That night I dreamt of caramel. All of my dreams featured it in some way. I dreamt of bubbling sugar, liquid in the pan but solid on the counter. I was surrounded by vast containers of dark, burnt toffee, with curdled cream and butter floating on top. Finally, I dreamt of the millionaire's shortbread, and the promise of a perfect, mellow, soft caramel, interspersed with the crunch of vanilla sea-salt.

The next morning, I couldn't wait to get out of bed. This is a very rare feeling for me! I went off to the supermarket, stocked up on sugar, butter and condensed milk. I was going to crack this today.

I mixed up the ingredients in a pan, playing slightly with the quantities. I stirred as the butter melted, then stirred as I added the sugar and the golden syrup. I kept stirring as I added the condensed milk. And stirred, and stirred. Slowly the texture began to thicken, and the taste became more caramelised. Then some brown lumps appeared. The baking community had warned that it would catch easily. NOOOOOOOOOO!

I whipped it off the heat, and strained it in to a new pan. Luckily, there were only one or two burnt specks, which got caught in the sieve. I turned the hob down to the lowest heat and stirred some more. I stirred for a full 30 minutes. I wasn't even convinced the mixture was thickening properly, and the colour didn't appear to be changing either. Still stirring, I reached over to the sink to get the sieve and the used pan. Only then did I realise how brown my mixture was! The old saucepan was a eggy yellow, but the one I was currently stirring was the colour of tanned skin after a good day at the beach (not my skin though, then it would have been a violent red).

Doing a little victory dance (but still stirring) I poured the caramel in to a bowl. While warm, it was fairly liquid, when cooled it was almost solid, but still pliable. Perfect.

Maybe when I have a kitchen with natural light I will be able to take good photos.

Salted Caramel Mocha Cookies.
Makes 40

Preheat the oven to 180C.

Mix 285g plain flour, 100g cocoa powder, and 2tsp of sea salt in bowl, with 2tbsp ground coffee.

In another bowl, cream 225g unsalted butter with 285g caster sugar. Mix in 2 egg yolks and 2 tbsp cream. Once combined, add in the flour cocoa mixture. Stir gently until combined, then turn out on to a work surface and knead until you have a smooth dough.
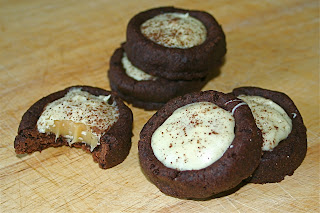
Divide the mixture in to 4, and then make 10 small balls from each of your quarters. If you don't want to make the 40 cookies, you can keep the dough in the fridge for a week, or the freezer for a month. Put the balls in the fridge for 2 hours to harden up. If you try to bake them straight away they will spread too much and break up.

Form each of the balls into a shape like a pie shell. You want the edges to be fairly thin, but not so thin that they will crack in the oven. About 5mm is ok.

Bake in the oven for 10 mins, and then cool on a rack. If any of the holes for the filling have risen, then push them down while still soft. While the shells are cooling, make the caramel.

Melt 180g unsalted butter in a saucepan over a low heat. When melted, add 75g caster sugar and stir until dissolved. Then add 2 tbsp golden syrup, and stir until combined. Finally, add in a can (397g) condensed milk, and stir continuously. When the mixture is golden and thick (and tastes caramelly) remove from the heat into a clean bowl. Stir in sea salt to taste. I used about 30g of vanilla sea salt, but I like my caramel SALTY.


Filling the shells

Once the caramel has cooled slightly (but is still liquid enough to pour easily) and the biscuit shells have hardened, fill the shells with caramel. Mine took about a tablespoon of caramel per biscuit.

Lots of filled shells

Finally, melt 200g white chocolate and spoon this over the caramel, smoothing out the edges so the caramel is hidden. Make it pretty with a dusting of cocoa powder.