Showing posts with label biscuits. Show all posts

Wednesday, 24 March 2010

Black and White Shortbread

I have been shying away from some of the more frivolous cookbooks in my collection, and find myself returning again and again to the Leith's Cookery Bible. I quite like the way pages upon pages of it are filled with French sounding dishes I've never even heard of. The first chapters give advice on how to cater a buffet for 80 people and the basics of food hygiene. There are few pictures, and they are mostly pretty useless for the basic home cook - 3 ways to present apple flans?

Black & White Shortbread

I had a craving for shortbread, and I had some chocolate left over from the stall that needed using up. I love making shortbread, as it uses very standard store-cupboard ingredients. It's ideal for late night baking sprees when you can't be bothered to go to the shop. It's also easily jazzed up by whatever ingredients you have lying around (I'm quite a fan of citrus and herbs).

Two-tone Shortbread

As the chocolate helps seal in the moisture, these keep really well. Be careful not to leave them in a warm place, as the chocolate will melt. While this won't affect the taste, they might become a bit blotchy looking. The rice flour helps to keep the texture really "short", but if you don't have any, you can substitute it for more plain flour.

Black & White Shortbread (adapted from Leith's Cookery Bible)
Makes about 8

110g butter
55g caster sugar
110g plain flour
55g rice flour
100g white chocolate
100g dark chocolate

1) Preheat the oven to 170C.
2) Thoroughly mix the sugar and butter together.
3) Add the flour, and gently knead to make a smooth dough.
4) Roll out the dough on a floured surface, to about 5mm thick.
5) Use a biscuit cutter to cut out large circles. Reroll the scraps until you have 8 biscuits.
6) Put the biscuits on a tray, and chill in the fridge for 30 minutes.
7) Bake in the oven for 20 minutes. They should be starting to turn golden.
8) Cool on a rack.
9) Melt the white chocolate in a small pot. Use a pot that the biscuits will only just fit in to, as you want it to be as deep as possible.
10) Line a baking tray with greaseproof paper. Dip the biscuits halfway in the white chocolate, and place them on the paper to cool. Put the tray in the fridge if your kitchen is warm.
11) Once the white chocolate has hardened, repeat steps 9 & 10 with the dark chocolate.

Monday, 22 February 2010

Salted Caramel Macarons

My first three attempts at macarons were pretty disastrous. Even looking back at the photos is making me cringe at how bad they were! My first go at a recipe from the Ottolenghi cookbook also entered into the "FAIL" category. I saw a few other blogs having success with the Ottolenghi macaron recipes, so I decided to remedy two fails with one baking session.

I had some egg whites already aging in the fridge, but I enjoyed weighing out 60g of them. I love doing everything by weight, mainly because I can't be bothered to get jugs and spoons out and create extra washing up. I don't know how Americans cope with cups. Have you ever tried scraping out peanut butter from the corners of a measuring cup so you can use it to scoop out another ingredient? It's lame. Buy a scale! Then you can just dump everything in one bowl!

A major problem with my last bunch of macarons was the lumpy mixture. They tasted ok, but macarons are meant to look a little bit pretty too. I don't have a food processor, so I gave the ground almonds and some of the icing sugar a bit of a bash around in a pestle and mortar before sifting them through a fine sieve.

I was also more confident about what the batter was meant to look like. It should be sturdy enough to pipe without running in to one big puddle, but soft enough that it will smooth down in to domes when left. After very carefully folding the sugar and almonds in to the whipped egg whites, it was obvious that the mixture was too stiff, so I got to give it a couple of good beats to get it down to a softer consistency.

After I'd piped all the macarons and topped them with some chopped peanuts, they sat by the radiator for a bit to form a skin while the oven preheated. In they went for 8 minutes, when I checked them to see if they were browning too fast.

Salted caramel and peanut macarons

YAY! While they were still underdone, every single macaron had a smooth topped dome, and some impressive looking feet. Another 4 minutes in the oven had the shells nicely starting to brown, and me dancing around the kitchen in triumph.

Finally with feet and smoothness!

Although I think that cooking is about making something that tastes good, there is always an element of presentation that I've struggled with. I don't have the patience to spend hours making things look perfect when all I want to do is eat them! So although my macarons had good feet and smooth tops, some of them were more ovoid that circular, so not a complete success, but good enough for me.

Once the shells were cool, I sandwiched them together with dulce de leche spiked with crushed peanuts and sea salt. I should have chopped the peanuts smaller and thickened the caramel more, as it was a bit oozy, and some of the larger peanuts made the macarons sit wonkily.

The smell when I opened the tin I'd stored them in was amazing, although I was a little disappointed that the peanut flavour wasn't that strong when it came time to taste them. However, after leaving them for 48 hours the flavours intensified, but the macarons lost a bit of their crunchiness. I would probably use more peanut next time to get the flavour and the texture.

The recipe is copied out here for your delectation.

Wednesday, 27 January 2010

January Daring Bakers - Nanaimo Bars

The January 2010 Daring Bakers’ challenge was hosted by Lauren of Celiac Teen. Lauren chose Gluten-Free Graham Wafers and Nanaimo Bars as the challenge for the month. The sources she based her recipe on are 101 Cookbooks and www.nanaimo.ca.

I first discovered Nanaimo Bars while driving round the Canadian Rockies. I left mine in the car while checking out a lake, and it melted. When we got to Peyto lake, I buried it in some snow, and by the time I returned to the car, it was solidified again. Woo!

As well as being excited to make Nanaimo bars, I was also interested in gluten free Graham crackers. I've had a lot of requests for GF stuff on the stall, and I wanted to know what Graham crackers tasted like.

I couldn't find sorghum flour anywhere, and internet searches revealed that UK sorghum is rarely truly gluten free. Instead, I used more white rice flour to replace it.

The Graham crackers were otherwise uneventful. As mentioned in the recipe, the dough is very sticky and soft, and quite hard to work with. Despite flouring the surface loads, only 2 or 3 crackers out of each attempt were sturdy enough to make it off the worktop and on to the baking tray. Patience and a lot of re-rolling was necessary.

Graham Crackers

I didn't really like the taste. The honey flavour was a bit sickly, although the texture was very similar to digestives, which are often cited as the nearest thing the UK has to Graham crackers. I ground up the rest to use in the base of the Nanaimo bars.

I pretty much followed the recipe, except for the coconut. I failed to measure how much was left in the packet before writing the shopping list, so I only had half the amount needed. To make up for the missing coconut, I added in some oats as well.

Nanaimo Bars

The custard layer was incredibly thick, and it wasn't helped that the current weather meant that the kitchen as freezing, so the butter was very hard. I was worried that the custard powder made it taste chalky, but I hoped the other elements would make up for this in the finished product.

Finally, I topped the bars off with dark chocolate ganache. It was tricky to stop the warm chocolate seeping in to the custard layer, so it was important to cool the chocolate and work quickly to stop the custard melting. Once the chocolate layer was chilled, I turned out the bars and cut them in to shape.

Coconut, oat, almond & chocolate base, custard filling, chocolate topping.

They were just how I remembered. The sickliness of the Graham crackers was lost in the chocolate and coconut of the bottom layer, and the chalkiness of the custard had also disappeared. The chocolate topping mirrored the bottom layer nicely. Another great challenge from the Daring Bakers!


Saturday, 21 November 2009

Orange and Rosemary Shortbread

It's taken me ages to write this post, just because there has been absolutely zero daylight in Edinburgh to take pictures with. It's so depressing that there is still a month left where it will just get darker. The curtains are shut and the lights are on by about 3pm most days. So, prepare yourself for some very dodgy photos in the coming months, and I apologise for my shaky-cam poor lighting. Brace yourselves for winter.

Anyway.

I've been thinking about the Lemon Thyme biscuits I made earlier in the year a lot lately. I wanted to make them again, but they didn't seem suitable given the cold and dark. Christmas doesn't seem like a lemon time of year. Oranges and clementines are more festive feeling to me.

Orange and Rosemary Shortbread

I swapped out the lemon zest for orange, and finely chopped a couple of sprigs of rosemary. I rolled the dough thicker than I would normally. It seems more appropriate to have a massive hunk of shortbread rather than a daintily thin slice. For some of the larger biscuits, I made a hole in the top so it could be used as a tree decoration.

Orange and Rosemary Shortbread Tree Decorations

The shortbread was crumbly and buttery, and the orange flavour shone through. The rosemary wasn't very strong, so added a pleasant herby aftertaste rather than a massive kick. I decorated the biscuits with an egg white wash and a sprinkle of granulated sugar, to create a frosty effect. Without the sugar topping, it was a quite grown up, but the extra sweetness made the appeal more universal, so perhaps more suitable for feeding to less refined palates! They are incredibly moreish though, so watch out...

Orange Shortbread with Rosemary
Makes lots

225g unsalted butter, softened
150g granulated sugar
zest of 1 orange
1 tsp salt
2 tsps finely chopped rosemary
1 egg, separated (save the white for the glaze)
275g plain flour
2 tbsps orange juice

GLAZE
Granulated sugar

1) Cream together the butter and sugar until light and fluffy.
2) Add in the orange zest, salt and rosemary, combine thoroughly.
3) Separate the egg, saving the white for glazing. Add the yolk into the biscuit dough mix.
4) Add the flour and orange juice. Once a dough starts forming, knead gently on a floured surface.
5) If the dough is sticky at this point, add more flour, a sprinkle at a time.Wrap the dough in clingfilm, and chill for at least an hour.
6) Preheat the oven to 180C, and line a baking sheet with greaseproof paper.Roll the dough out to 5mm thick, and cut circles out (I used a 2 inch diameter cutter). Keep gathering the scraps and re-rolling until you have about 40 biscuits.
7) Brush the biscuits with egg white, and then sprinkle with granulated sugar.
8) Bake for 15-18 minutes, until the biscuits are just turning golden brown at the edges.Cool on the tray for 1 minute, then move to a wire rack to finish cooling.

Thursday, 5 November 2009

Korova Cookies

This is a bit of a landmark here - my 100th post! Although really two of them don't count as the introduction and links should be on pages rather than posts... but anyway. I have filled this blogger text box out 100 times. Who knew I was that dedicated!?

T's brother and his girlfriend are visiting us this weekend. I have a bit of a reputation amongst T's family for being a baker, so I knew I had to make something to welcome them, but at the same time I didn't want to do anything too crazy that they would feel obliged to eat. I settled on Dorie Greenspan's Korova cookies (sometimes also known as "world peace" cookies - the idea being that if these were handed out there would be no more need for war). How could anyone resist buttery chocolate biscuits studded with chunks of dark chocolate?

Korova Cookies

I made the dough for these the night before, and left it to rest overnight. It was hard to resist baking some of them straight away for a midnight snack. In between cleaning the flat, I sliced off 12 rounds and baked them. Within minutes, the flat smelt like melting chocolate. Obviously I had to check they were ok, and had eaten 2 while they were still warm. By the time T had picked up his brother from the station, I'd eaten 7 of the of the 12 I'd baked. In the introduction, Dorie warns you not to make them when you are alone, and she is right. They are dangerously addictive.

Crumbly and crispy

So I baked another batch, and it came out of the oven just as T and his brother came through the door. They are crispy and just chewy when cool, but when they are warm, the crumbly biscuit and the gooey chocolate are sublime. The hint of salt and the dark chocolate also make them a little more grown up than your average cookie.

If you like the sound of these, Deb of Smitten Kitchen has already typed the recipe up rather well.

Tuesday, 27 October 2009

Daring Baker's October - Macarons

I first discovered the macaron in March 2008, when I went to to visit H, who was doing her year abroad in Paris. We went to all the usual places, and eventually ended up in Fauchon. H told me I should get the lemon macaron. I did. It was yummy. I've considered making them at home a few times, but every time I searched for a recipe I was put off by how many results I got saying that they were tricky.

The 2009 October Daring Bakers’ challenge was brought to us by Ami S. She chose macarons from Claudia Fleming’s The Last Course: The Desserts of Gramercy Tavern as the challenge recipe. So now I couldn't put off macarons any longer.

My first attempt failed miserably. I overwhipped the batter and it was too runny to form any kind of shape. It was still tasty though.

The second attempt was a little better. I had some freeze dried raspberries after my mum found somewhere online that sold "home-sized" portions instead of wholesale. I crushed these up to make a powder, and mixed this in to the batter. It was a lovely creamy white with flecks of raspberry powder in it, and piped easily in to rounds. I dried the rounds in a low oven as suggested, and was pleased to see the beginnings of some feet on my macarons!

However, I found the 7 minutes cooking time suggested in the recipe to be too long, and my macarons went too brown. I sandwiched them with raspberry buttercream (also made with powdered raspberry). While these macarons had the chewiness of a proper macaron, they didn't have the smooth, crisp shell.

Raspberry Macarons with a tiny foot!

So on to the third attempt! This time I used lime zest, and a drop of green gel colouring. I sieved the almonds and sugar twice to make sure it was superfine (although I think if I had a food processor and could have ground the nuts even more it would have been better) and folded the mixture carefully. I watched the macarons like a hawk to ensure they didn't brown (although a couple at the back of the oven still did a little).

Lime Macarons and Fauchon Mug

As it was late, and I didn't have enough time to cool and reheat the oven for drying the second batch, I experimented a little. I left the tray of piped macarons in the oven overnight, once the temperature had dropped below 90c, then baked them this morning for 5 minutes. These ones are the smoothest, but they don't have a foot or a crispy shell! Curses!

What they lack in aesthetics they somewhat make up for in taste.

I sandwiched these with lemon curd, which gives them a good citrus hit. They taste ok, but they need a lot more work. However, the process was easy enough that I'll give macarons another go sometime soon.

Saturday, 24 October 2009

Lemon Sundae

Generally I am fairly organised in the kitchen, and like to have all my ingredients and equipment out before I begin. I found some lemons in the cupboard that were on their last legs, so I decided to give a recipe for lemon biscuits a go. As I'd never tried this recipe before, and it looked a bit tricky, I went super-overboard on the mise-en-place. As well as getting my ingredients out, I pre-weighed them all, and left them out for a couple of hours to reach room temperature.

To cut a long story short, despite the extreme prep, it was an unmitigated disaster. What were meant to be crunchy little lemony biscuits turned into a big old cakey mess that was stuck to the baking tray. My first thought was to bin the whole thing, but it seemed such a waste. When I was a child, any leftovers were greeted with a remark about starving Africans, so throwing food away just makes me feel guilty. Instead, I chipped it off the baking tray and made the rest of the lemons in to some yummy lemon curd.


Lemon Sundae

It might not be very sophisticated, but the cake/biscuit fail crumbs, mixed with the fresh lemon curd and some plain yoghurt was delicious. The thing I really like about cooking is that you can be creative. As well as trying out different flavours and presentations, if something goes wrong it's usually salvageable if you are a bit creative. In this case, I liked the way the sweet biscuit, the sweetly tart curd and the plain yoghurt balanced each other out. The biscuits on their own were a bit tooth-hurtingly sweet anyway.


I love lemon curd

I might give the biscuits another go, or I might just content myself with eating this for breakfast for the next few days. Who needs a balanced diet when you can have cake sundaes?

PS - Check out the ridiculously loud coasters I bought in Russia!

Tuesday, 29 September 2009

Palmiers

Although it was fun making the vol-au-vents for the Daring Bakers, using circular cutters meant I had loads of puff pastry scraps. Unlike shortcrust pastry, these can't just be scrunched up and re-rolled. The scraps have to be stacked to preserve the layers, but even then they probably won't be able to achieve the same rise as the original pastry could.

So, having a massive pile of scraps that weren't going to rise properly, it seemed sensible to follow Joy's advice and make palmiers!

I couldn't decide whether to go sweet or savoury. I went with both.

The sweet were dusted with vanilla sugar and mixed spice. The sugar caramelised and made them crunchy and chewy and delicious. The speckles of vanilla and spices mingled to give an appropriately autumnal flavour.

Sweetly Spicy Palmiers

The savoury ones were layered with an extra mature cheddar and cayenne pepper. The cheese is far too strong to eat on it's own, and even T, who loves a good cheddar found it too harsh. However, when baked up, the cheese flavour mellowed out and became more pleasant. The cayenne gave it a bit of a kick and stopped it feeling too fatty.

Cheesy Palmiers

Although I preferred the taste of the sweet palmiers, the cheesy ones would be perfect for a pre-dinner snack, and are a great way to use up any puff-pastry scraps you might have lying about!

Sunday, 6 September 2009

Chocolate Chip Cookies

I'm still in limbo between flats, and I'd sworn off baking until we reached the new flat. However, with T passed out on the sofa watching Jonathan Ross, and this month's issue of Delicious already read, I was bored and the kitchen was calling.

Raiding the cupboards showed there was some flour, baking powder (no idea how T managed to obtain that, I must have bullied him in to buying it at some point) and a bar of chocolate left over from the chocolate terrine. I didn't have any cake tins or a baking sheet, only a roasting tin, so today was not the occasion to attempt the Daring Baker's back catalogue.

Instead I opted for a classic chocolate chip cookie, with hefty chunks of chopped chocolate. I reappeared from the kitchen 30 minutes later with cups of tea and a couple of freshly baked cookies. Not the most exciting Friday night, but certainly a tasty one.

Chocolate Chip Cookies

You can also save this dough in the fridge for a few days, so I baked up the rest of these this morning for elevenses.

RECIPE
115g softened butter
100g brown sugar
25g caster sugar
1 egg
1tsp vanilla extract
215g plain flour
1tsp baking powder
pinch salt
110g chocolate (cut in to chunks or chips)

Makes 24 cookies

1) Preheat the oven to 190c (Gas Mark 5)
2) Cream the butter and sugar until smooth, then add the egg and vanilla extract.
3) Add in the flour, salt and baking powder and briefly mix to form a dough.
4) Add in the chocolate and mix again to distribute the chips throughout the dough.
5) Divide the dough into 24 balls, and place on a greased baking sheet, lightly pressing each ball to flatten it in to a cookie shape. (At this stage you can store any extra dough in the fridge for a week or the freezer for a month.)
6) Bake for 10-12 minutes until golden. Transfer to a wire rack until cool. (If your cooling rack is in a self-storage facility, you can use the rack from a roasting tin that you found at the back of a cupboard)

Wednesday, 26 August 2009

Snickerdoodles

The other day, I realised I hadn't baked anything for at least a week. Plus my flatmate L was coming back to Edinburgh to move out of the flat, so baked goods were absolutely required.

Snickerdoodles are something that I'd seen a few recipes for, but never actually tried them in real life. I noticed a recipe for the them in Rachel Allen's "Bake", so it was time to give them a go.

The recipe itself is pretty easy, and you can find the Rachel Allen version already typed out here. "Bake" is fast shaping up to be one of the most reliable cook books I own, and my snickerdoodles came out very similar to Maria's.

Snickerdoodles, from "Bake" by Rachel Allen

I was possibly a bit generous with the nutmeg, but this mixed with the creaminess of the butter to create something very reminiscent of an egg custard tart in biscuit form. I wasn't entirely sold on the crispy outside with a cakey centre, but I can see its appeal. I liked the spiciness, and these are very "autumnal". I'd probably remake these as little Christmas presents to give out randomly, but make the spicing a bit more subtle and try to make them a bit thinner and crispier. Although that might move them too far to the realm of gingerbread, but anyway.

I've just discovered now that they are also pretty tasty dunked in tea and coffee, and they're strong enough not to crumble too much either.

Sunday, 12 July 2009

Lemon Thyme Shortbread - A Bake Swap

A while ago, I sent a complete stranger a mix CD of my favourite music. The stranger sent me a CD back. I liked some of the music, and thought some of it was weird. I loved getting a random CD in the post though. Welcome to the world of internet swaps!

I hadn't done a swap in ages, when I stumbled across a bake swap. I like baking and I like random stuff. I signed up straight away.

Once I'd sent the email, I began to dread the swap. What if I got someone who is vegan? Or gluten free? Or some other weird allergy/dietary requirement that I can't bothered to work around. (Part of me thinks that if you are seriously limited about what you can eat, you should stick to the mix CDs instead.)

When I received my swap partner's details I was shocked. I googled the details in the email. Woah.

Luckily, she was not on some crazy diet, but living in a flat 5 minutes away from the house I spent the first 18 years of my life in. The randomness just got even better!

She said that she liked citrus flavours, and I've been thinking a lot lately about using herbs in sweet foods. I made an awesome orange and rosemary cake once, so I wanted to do something along those lines. I eventually settled on lemon shortbread with thyme.

This recipe was a bit experimental, and was inspired by several other recipes, with this one by Sophistimom being really helpful. I've changed a few of the quantities, and presented them differently. The biscuits are very crisp and crumbly, with an immediate lemon zing, followed by an aftertaste of refreshing herbs. I would prefer a bit more of an "upfront" herb flavour, but I didn't want to go too overboard on the thyme on this occasion.

Box of Lemon Shortbread with Thyme Glaze

Lemon Shortbread with Thyme

225g unsalted butter, softened
150g granulated sugar
zest of 1.5 lemons (save the other half a lemon for the glaze)
1 tsp salt
2 tsps finely chopped thyme
1 egg
275g plain flour
2 tbsps lemon juice

GLAZE
Turbinado sugar (can use demerara)
4 tbsps icing sugar
juice of 1 lemon
zest 0.5 lemons
1 tsp finely chopped thyme
  • Cream together the butter and sugar until light and fluffy.
  • Add in the lemon zest, salt and thyme, combine thoroughly.
  • Separate the egg, saving the white for glazing. Add the yolk into the biscuit dough mix.
  • Add the flour and lemon juice. Once a dough starts forming, knead gently on a floured surface. If the dough is sticky at this point, add more flour, a sprinkle at a time.
  • Wrap the dough in clingfilm, and chill for at least an hour.
  • Preheat the oven to 180C, and line a baking sheet with greaseproof paper.
  • Roll the dough out to 5mm thick, and cut circles out (I used a 2 inch diameter cutter). Keep gathering the scraps and re-rolling until you have about 40 biscuits.
  • Brush half the biscuits with egg white, and then sprinkle with turbinado sugar. Other half of the batch stay plain for the moment!
  • Bake for 15-18 minutes, until the biscuits are just turning golden brown at the edges.
  • Cool on the tray for 1 minute, then move to a wire rack to finish cooling.
  • Once cool, mix the icing sugar, lemon juice, lemon zest and thyme to make a glaze.
  • Put half a teaspoon of glaze on each of the plain biscuits, spreading it out with the back of the spoon.
  • Once the glaze is dry, serve with tea.
Lemon Thyme Shortbreads

I am excited to see what I get back in return!

Tuesday, 7 July 2009

The Graduation Bake-a-thon.

As it was graduation week, we have had various friends, relatives and randomers drifting in and out of the flat all week. In an attempt to be hospitable, we all chipped in to an ingredients pot and I went on a baking binge.
The lemon roulade was amazing, and the left over lemon curd is in the fridge. I haven't told my flatmates this yet as once I do it will not be around for long. The only trouble I had with this recipe was that the sponge broke up when I tried to roll it. Luckily I had enough lemon curd and mascarpone to stick it back together, but it looked a bit messy from the side.

Broken lemon roulade - tastes better than it looks

The carrot cake is one of my favourite ones, as it is so dense and moist. However, I made it in mini loaf tins as I wanted to freeze a cake for later in the week in case the first batch went stale/got eaten. As the mixture is so dense, it is prone to burning on top but still being undercooked in the middle. Luckily I managed to get away with it this time, but the cake was a little moister than I would have liked, and a little crispy on top. I also swapped out the walnuts for hazelnuts as I had them in the cupboard already.

Carrot cake with vanilla mascarpone topping

I have altered the Cupcake Bakeshop recipe, and never use the strawberries in the filling, partly because they don't add that much and partly because even in season they are so expensive! The buttercream icing on top is perfect. It's creamy and sweet but without being overpowering. The texture of the cake itself is nothing special, but when it has the ganache filling it is AMAZING. I have yet to give anyone this cupcake and for them not to fall in love with it.

I'd made the Korova cookies before, but this time I used white chocolate chips instead of dark, just because I'd messed up the shopping list and not bought enough plain chocolate to make these and the chocolate cupcakes. I also think I sliced them a bit thin as they were too crispy and a little tough. Still delicious though!

Roulade and Carrot Cake, boxes of cookies

Once again, me and caramel failed to get on. I burned the mixture and had to strain it through a sieve in to a fresh pan. I also didn't cook it enough for it to stay in the biscuits, so some of them leaked as the caramel was too runny. I also got the quantities completely wrong, so now we have a massive tub of caramel in the fridge alongside the lemon curd!

Overall, I think I need to plan baking binges better. I ran out of muffin cases and baking powder, but had way too many eggs. I tried to make things in an order to best maximise things like oven capacity and cooling racks, but if I'd thought it through better I would have made things like cookie dough in advance. I also need some more attractive display containers. The cake caddy is pretty awesome, but kind of utilitarian looking. Any ideas?

Monday, 22 June 2009

Dorie Greenspan's Croq-Tele (TV Snacks)

The quest to work my way through the whole of "Paris Sweets" continues with Patisserie Arnaud Larher's Croq-Teles. The name translates as "TV crunches", as they are an ideal substitute for popcorn or crisps. I made the hazelnut version, with ready ground nuts as I don't have a food processor.

Croq-Teles

These little biscuits were deliciously moreish, and the recipe introduction promised "up-front saltiness". However, I found them only a tad salty, and should have added much more salt to get that sweet-savoury taste. I don't know if this is because I have a mild salt addiction, or just the European habit of putting salt in everything! I find "Paris Sweets" an interesting book because Dorie Greenspan often comments on recipes from an American viewpoint. Sometimes I agree with her, and sometimes her comments seem so strange to me! I guess that is as close as I will get to proof that I am more at home in Europe than in the special relationship.

The dough is incredibly dry and crumbly, and reminded me a lot of making shortbread. The mixture barely holds together, so you have to squish it quite hard to get the balls to form.


A Stack of TV Snacks

Croq-Tele (adapted from Dorie Greenspan's Paris Sweets)

75g ground almonds
25g ground hazelnuts
100g sugar
1tsp vanilla sea salt
140g plain flour
100g unsalted butter, cubed

1) Preheat the oven to 180c, and line a large baking sheet.
2) Mix the ground nuts, sugar and salt together in a bowl, making sure there are no lumps.
3) In another bowl, crumble the flour and butter together, either using your fingertips or a pastry blender. The mixture should look like breadcrumbs.
4) Add the nut-sugar mixture, and combine. The dough should come together but be quite fragile. Tip it on to the worktop and squidge it together to form one lump.
5) Pinch of small pieces of dough and form in to rough balls. You should be able to get about 50 cookies from the mixture, so each ball should be about the size of a cherry.
6) If you have a large baking tray, you might be able to fit all of the cookies on, otherwise you'll need to do two batches. They don't spread much in the oven, so they'll only need 1.5-2cm gaps between them.
7) Bake the cookies for between 10-15 minutes. They should be set but not browned.
8) Cool them on the baking tray for 3 minutes, if you pick them up too early they'll crumble.
9) Once hardened, transfer them to a cooling rack. Try not to eat them all immediately!

EDIT: Just found the original recipe and commentary online.

Monday, 13 April 2009

Salted Caramel Mocha Cookies

In Delicious. this month there is a was an advert for a coffee machine which came with an recipe for cappuccino thumbprint cookies. This got me thinking, and I suddenly became obsessed with adapting the recipe to make salted caramel mochas.

I followed the dough recipe pretty closely, only making a couple of changes to the method. It was the filling that really took time and experimentation. I wanted to make a creamy caramel, much like you get inside a Twix or a Mars bar. Using Leiths, and various online recipes, I made four batches of caramel. All of them were rubbish. The first couple burned, even though I was using a sugar thermometer. The second two I was much more careful with, and took them off the heat well before they were anywhere near burning point. I tried stopping one with cream, but instead it just turned in to a giant lump of hard sugar and some slightly dubious looking brown cream. The next batch I used a combination of milk and butter. This had a better consistency, but was a very dark brown and instead of being smooth and creamy, had a weirdly grainy mouthfeel.

4 attempts at caramel meant that I had run out of sugar, clean saucepans and dairy products. My fingers were covered in tiny burns from boiling, spitting sugar, and I was getting frustrated. Why was boiling some sugar so difficult? I was being attentive, monitoring the temperature, and not stirring too much. The part of me that thinks I am a good cook suggested that it was a combination of a dodgy electric hob and a cheap, thin saucepan. The part of me that wants to be a good cook thought I was probably stirring too early, heating too quickly, and getting distracted too easily.

While searching online, I found a recipe for millionaire's shortbread. Looking at the picture, it seemed that was exactly the type of caramel I was looking for. A baking community I posted on also suggested a similar recipe. I noted down the ingredients, and went to bed. That night I dreamt of caramel. All of my dreams featured it in some way. I dreamt of bubbling sugar, liquid in the pan but solid on the counter. I was surrounded by vast containers of dark, burnt toffee, with curdled cream and butter floating on top. Finally, I dreamt of the millionaire's shortbread, and the promise of a perfect, mellow, soft caramel, interspersed with the crunch of vanilla sea-salt.

The next morning, I couldn't wait to get out of bed. This is a very rare feeling for me! I went off to the supermarket, stocked up on sugar, butter and condensed milk. I was going to crack this today.

I mixed up the ingredients in a pan, playing slightly with the quantities. I stirred as the butter melted, then stirred as I added the sugar and the golden syrup. I kept stirring as I added the condensed milk. And stirred, and stirred. Slowly the texture began to thicken, and the taste became more caramelised. Then some brown lumps appeared. The baking community had warned that it would catch easily. NOOOOOOOOOO!

I whipped it off the heat, and strained it in to a new pan. Luckily, there were only one or two burnt specks, which got caught in the sieve. I turned the hob down to the lowest heat and stirred some more. I stirred for a full 30 minutes. I wasn't even convinced the mixture was thickening properly, and the colour didn't appear to be changing either. Still stirring, I reached over to the sink to get the sieve and the used pan. Only then did I realise how brown my mixture was! The old saucepan was a eggy yellow, but the one I was currently stirring was the colour of tanned skin after a good day at the beach (not my skin though, then it would have been a violent red).

Doing a little victory dance (but still stirring) I poured the caramel in to a bowl. While warm, it was fairly liquid, when cooled it was almost solid, but still pliable. Perfect.
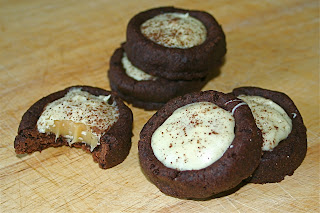
Maybe when I have a kitchen with natural light I will be able to take good photos.

Salted Caramel Mocha Cookies.
Makes 40

Preheat the oven to 180C.

Mix 285g plain flour, 100g cocoa powder, and 2tsp of sea salt in bowl, with 2tbsp ground coffee.

In another bowl, cream 225g unsalted butter with 285g caster sugar. Mix in 2 egg yolks and 2 tbsp cream. Once combined, add in the flour cocoa mixture. Stir gently until combined, then turn out on to a work surface and knead until you have a smooth dough.

Divide the mixture in to 4, and then make 10 small balls from each of your quarters. If you don't want to make the 40 cookies, you can keep the dough in the fridge for a week, or the freezer for a month. Put the balls in the fridge for 2 hours to harden up. If you try to bake them straight away they will spread too much and break up.

Form each of the balls into a shape like a pie shell. You want the edges to be fairly thin, but not so thin that they will crack in the oven. About 5mm is ok.

Bake in the oven for 10 mins, and then cool on a rack. If any of the holes for the filling have risen, then push them down while still soft. While the shells are cooling, make the caramel.

Melt 180g unsalted butter in a saucepan over a low heat. When melted, add 75g caster sugar and stir until dissolved. Then add 2 tbsp golden syrup, and stir until combined. Finally, add in a can (397g) condensed milk, and stir continuously. When the mixture is golden and thick (and tastes caramelly) remove from the heat into a clean bowl. Stir in sea salt to taste. I used about 30g of vanilla sea salt, but I like my caramel SALTY.


Filling the shells

Once the caramel has cooled slightly (but is still liquid enough to pour easily) and the biscuit shells have hardened, fill the shells with caramel. Mine took about a tablespoon of caramel per biscuit.

Lots of filled shells

Finally, melt 200g white chocolate and spoon this over the caramel, smoothing out the edges so the caramel is hidden. Make it pretty with a dusting of cocoa powder.

Friday, 9 January 2009

Punitions

Punitions

This week I finally got to do some baking from Dorie Greenspan's "Paris Sweets". I'd got the book for my birthday, but the craziness of Christmas and New Year meant that I'd only been able to read through the recipes, and hadn't tried any out yet.

I didn't have much time, so I did the very first recipe in the book, butter biscuits from the Poilane bakery (home of the famous pain Poilane sour dough loaf). They are called "punishments" as a bit of a joke, as the blurb leading up to the recipe explains. I even attempted to make them in the same way Greenspan describes Lionel Poilane making them, in a flour fountain. I got the dough together eventually, but the counter in our kitchen is too small to get a proper sized fountain going.

I baked these in T's gas oven, which I am beginning to think is a little cooler than the dial suggests, so I was worried that they weren't throughly cooked. I have frozen half the dough though, so I can test the other half in my oven which is electric and a bit more predictable than T's.

From the perspective of a resident of Scotland, where shortbread is pratically a staple food (and as someone who also managed to acquire 500 sticks of shortbread last summer after a charity raffle gone wrong) I found the texture of these a bit odd. The addition of an egg meant that they weren't as "short" as shortbread, but they were some how crispy yet soft at the same time. Reading the post by Greenspan on her blog, I am intrigued by the idea of butter tasting. I used Country Life (unsalted) to make these, but they didn't taste that buttery to me. I have been eyeing up some Italian cream butter, buerre d'Isigny, Bridel Sea Salted butter and goat butter in Waitrose recently. I think next time I have some spare money (and have been to the gym lots) I shall spend an afternoon eating bread and butter and seeing which one I think is best.

Star Shaped

Having delved in to "Paris Sweets" my opinion is now slightly altered from my first look at it nearly a month ago. Although most of the measurements are in American cups, there are gram measurements next to it, so that makes life a bit easier. The annoying element now is that most of the recipes are based around using a stand mixer, which I don't have. I'm sure most Parisian pastry chefs didn't have stand mixers until recently either, so it's a bit of a pain to reconvert the recipe back to something that can be done by hand. My initial assessment that it was a book for special occasions also has changed, and I can see myself attempting most recipes in this book at one time or another.

(I also charged the batteries on my dSLR so prepare for slightly better pictures from now on!)